Showing posts with label Recipe. Show all posts

Friday, June 11, 2010

The Cream of the Crop Shimmering Like a Vivid Blue Sapphire....The Royal Blue Potato~!

Aside from the greens, urge your peers to add-on their blues!


All Blue potatoes are probably the most direct descendant of potatoes found almost 10,000 years ago high in the Peruvian Andes mountains, and likely smuggled into the United States from Peru in a diplomatic pouch around 1957, delivered to Sylvan Ambrose Hart who cultivated them. The blue potato is also proving a hit across Ireland since it was recently introduced to the market by a Dublin family which has been growing vegetables for 200 years.

With a genetic flaw in these gems, a mutation in the P locus of their chromosome sequence, this results in giving these humble spuds a natural plus, the production of an antioxidant anthocyanin, a flavonoid 3',5'-hydroxylase.

Apart from the potential health benefits, it is its nostalgic appearance, a deep nutty flavour, and a heavenly texture that captured my attention. As the starch swells in the vigourous heat of dry sauna, each granule explodes into a creaminess that could almost mask its heavily fat laden mashed cousins. The salty grains further enhance the natural nuttiness of these gems..


~ Simple Roasted Royal Blue Potatoes ~


serves 8

3 lb Blue Potatoes, washed and quartered, and thoroughly dried.
~1/3 cup Olive oil, enough to coat all potato wedges
3 Tbs fresh herbs, coarsely chopped (mixture of your favourites! I used rosemary and thyme)
4 clove garlic, minced

kosher salt
freshly cracked black pepper

1. Preheat your oven to 400 degrees. Line a roasting pan with parchment paper or aluminum foil.
2. Place the quartered potatoes on the roasting pan. Drizzle the oil and chopped herbs over the quartered potatoes, and shake the pan until the potatoes are evenly coated. Do not add the minced garlic at this stage.
3. Roast the potatoes uncovered for 20 minutes. Shake the pan at the 20-minute mark maneuver the potatoes, then roast for another 15-20 minutes.
4. Check the potatoes, and when the potatoes begin to colour, add the minced garlic, shake the pan again to evenly coat the potatoes in garlic, and roast for another 10 minutes, or until golden and crispy.

For an extra indulgence, tasty bits of crispy bacon wouldn't hurt!

Bon Appetit~!

Sunday, April 18, 2010

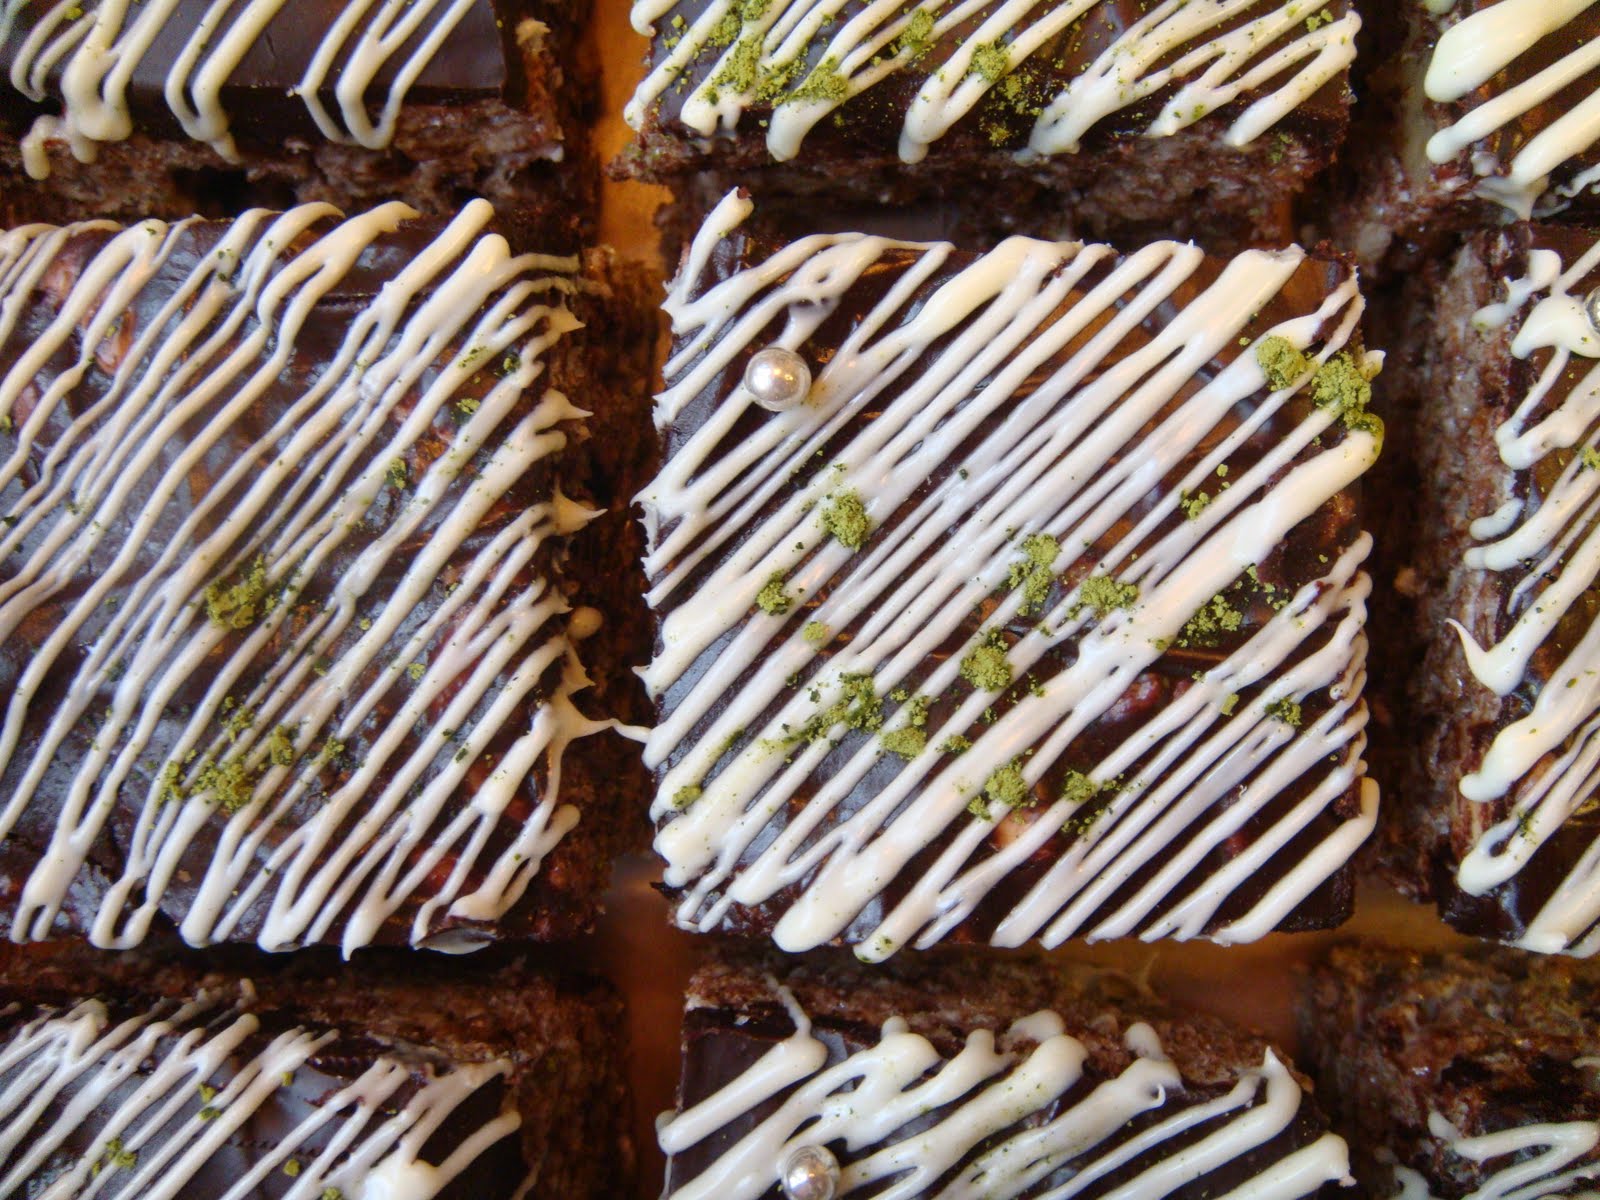
Glam-up the traditional Rice Krispie Treat with Earl Grey for a Fetus Fiesta~!

a.k.a., a gender-friendly Baby Shower that just won the Best Title Award!


As the time runs short, I allowed my favourite flavour and aroma to guide through a mysterious venture, giving me the inspiration to dress up an ordinary treat in a savoury couture.


~ Earl Grey Rice Krispie Treat ~


3 tbs Unsalted butter
10 oz package Miniture marshmallow
6 cups Cocoa Rice Krispie
Earl Grey Ganache
- 4 Earl Grey tea bags
- 10 oz Chocolate couverture (60-71% cacao), chopped finely and place in a bowl
- 1 cup Heavy Cream
Melted white chocolate for final touches, French silver dragees optional


1. In large saucepan melt butter over low heat. Add marshmallows and stir until completely melted. Remove from heat.

2. Stir in the cereal until well coated.

3. Using buttered spatula or wax paper evenly press mixture into buttered 13 x 9 x 2-inch pan. Allow the mixture to cool.

4. Pour Earl Grey Ganache (recipe below) and spread evenly over the treat. Allow it to solidify prior cutting into desired sizes and shapes.

5. Drizzle the pieces with white chocolate.


Earl Grey Ganache:

1. In a small sauce pan, bring the heavy cream to a slow simmer.

2. Add the Earl Grey tea bags and allow them to seep in the cream for 5 minutes.

3. Remove the tea bags and bring the heavy cream back to a boil.

4. Pour the boiled cream over the chopped chocolate, allow the chocolate to melt undisturbed for 1 minute.

5. Stir the cream and chocolate mixture gently until chocolate has completely incorporated into the cream.


For further information on Earl Grey tea, please check out my other post:
"Earl Grey....from an obsession to a devotion...."


Bon Appetit~!

Friday, February 26, 2010

Delicacies for Chinese New Year Round Three - The Overloaded Taro Cake~!

This recipe is dedicated to my family, and to anyone who is as obsessed with this purple root as we are! Just make sure you do not overload with this fragrant yet zesty tasting taro, which turns the cake into a more croquet like consistency, but still mouthwatering.


For those who might be interested in reading further on this amazing root, please check out my previous post:
"Macaron de la divinité captures the essence of this mulberry purple coloured root....~ le Macaron aux Taro~
Taro flavoured macaron filled with coconut white chocolate ganache"


~ Chinese Taro Cake - 芋頭糕~

Ingredients:

- 2 lb Taro root - about 2 medium size, peeled and cut into 1/2 cubes
- 500 g plain rice flour (粘米粉) - not glutinous rice flour
- 4 long links Chinese sausages (臘腸) - cut into 1/4 inch cubes
- 200g Chinese cured bacon ((臘肉) - cut into 1/4 inch cubes
- 4 dried scallops, 3 tbs dried shrimps, 6 dried shiitake mushrooms
(place all 3 above ingredients in a bowl and soak overnight with cold water just
enough to cover all the ingredients)
- 750mL water
- 3 tbs chicken bouillon powder
- 4 tsp white pepper
- 2 tsp five spiced powder
- 3 tsp salt
- 4 tsp sugar
- a bunch of coriander - coarsely chopped


1. Squeeze out the soaking liquid from the hydrated dried scallops, dried mushrooms and shrimps, and finely chop these ingredients. Reserve soaking liquid.
2. Steam the cubed taro in a even layer for 20 minutes or until all pieces have turned slightly translucent.
3. Heat up a wok or a large frying pan over medium high heat, add in the Chinese sausages and cured bacon, stir-fry for a 5-8 minutes or until most of the oil has rendered out from the cured meats.
4. Gradually add the finely chopped mushrooms, scallops and shrimps. Keep stir frying them for about 5 minutes.
5. Stir in all the seasonings and allow them to warm in the mixture for a minute. Remove from heat.


6. In a large baking pan (ideal size would be a 16 inches in diameter and 4 inches deep, or 2 9-inch cake pan would also be fine), pour in the rice flour and gradually stir in the soaking liquid and water. Mix until completely incorporated.
7. Stir in the solid ingredients from the wok and mix thoroughly, and gently fold in the steamed taro cubes.
8. Steam the cake in a large wok with consistent yet vigourous steam for an hour and a half.


9. When it is cooked, remove from heat and sprinkle the chopped coriander on top as garnish.
10. The cake can be served immediately as the steamed version,


11. For the pan-fried version, allow the cake to cool and refrigerate overnight. Cut the cake into slices and pan-fry until golden brown and crispy on each side. Serve with XO sauce or chili sauce if preferred.


Bon Appetit~!

Thursday, February 18, 2010

Celebrate a decade of absence with my grandmother's famous Chinese Daikon Cake!

I often wondered what Chinese New Year is like for visitors in Hong Kong. This festival is a time for families to reunite, not only to welcome in the new lunar year, but also to feast together with home-prepared meals. Meanwhile, as the expat population flies to places like Bali or Thailand for the extended national holiday, the trains to the rural New Territories would be overflowing, while the bar-filled Lan Kwai would be partly deserted.


To celebrate the 10-year anniversary of my absence from Hong Kong during this festivities-filled celebration, I subconsciously trickle passed the fellow patrons of a local Chinese grocer, fluidly gathered all the necessary ingredients, for the making of my favourite Chinese Daikon Cake (蘿蔔糕).

Chinese Daikon Cake or Lo Pak Gao, is my all time favorite, you can find this all year round in Dim Sum restaurants. Yet, this speciality dish, similar to the Chinese New Year cake, is one that almost no commercial versions would be in competition with ones made at home, filled with joy, love, and hours of grating, chopping, steaming, and enduring the stinging sensation as the daikon juice attacks the skin surrounds your fingers....thanks dear Granny, Mum and Dad for all the decadent daikon cakes I have devoured in the past!


~ Chinese Daikon Cake ~

Ingredients:

- 6 lb Chinese daikon - about 3 large ones
- 500 g plain rice flour (粘米粉) - not glutinous rice flour
- 4 long links Chinese sausages (臘腸) - cut into 1/4 inch cubes
- 200g Chinese cured bacon ((臘肉) - cut into 1/4 inch cubes
- 4 dried scallops, 3 tbs dried shrimps, 6 dried shiitake mushrooms
(place all 3 above ingredients in a bowl and soak overnight with cold water just
enough to cover all the ingredients)
- 2 tbs chicken bouillon powder
- 2 tsp white pepper
- 1 tsp five spiced powder
- 2 tsp salt
- 3 tsp sugar
- a bunch of coriander - coarsely chopped


1. Squeeze out the soaking liquid from the hydrated dried scallops, dried mushrooms and shrimps, and finely chop these ingredients. Reserve soaking liquid.


2. Coarsely grate the Chinese daikon and place the grated daikon in a strainer over a large bowl. Squeeze out as much of the liquid from the daikon, but reserve the liquid.


3. Heat up a wok or a large frying pan over medium high heat, add in the Chinese sausages and cured bacon, stir-fry for a 5-8 minutes or until most of the oil has rendered out from the cured meats.


4. Gradually add the finely chopped mushrooms, scallops and shrimps. Keep stir frying them for about 5 minutes.
5. Stir in all the seasonings and allow them to warm in the mixture for a minute before adding the grated daikon. Stir-fry all the ingredients for about 2 minutes and remove from heat
6. In a large baking pan (ideal size would be a 16 inches in diameter and 4 inches deep, or 2 9-inch cake pan would also be fine), pour in the rice flour and gradually stir in the reserved daikon juice and soaking liquid. Mix until smooth.
7. Stir in the solid ingredients from the wok and mix thoroughly.


8. Steam the cake in a large wok with consistent yet vigourous steam for an hour and a half.


9. When it is cooked, remove from heat and sprinkle the chopped coriander on top as garnish.
10. The cake can be served immediately as the steamed version,
11. For the pan-fried version, allow the cake to cool and refrigerate overnight. Cut the cake into slices and pan-fry until golden brown and crispy on each side. Serve with XO sauce or chili sauce if preferred.
12. It can also be transformed into the famed dish in HK XO sauce stir-fried daikon cake (XO 醬炒蘿蔔糕). Cut a portion of the cake in small cubes and stir fry with finely chopped garlic, bean sprouts, sliced red and green bell peppers, eggs, and XO sauce.

Bon Appetit~!

Thursday, February 11, 2010

The Sticky-Sweet New Year Cake....it was love at first bite!

From an elaborate two-day production to the lightning-fast microwave approach, the methods of preparing Nian Gao may have changed across generations of the Chinese families, but the sticky-sweet New Year's cake is still a savory culinary project within my household, embracing my grandmother's recipe.


Nian Gao, or Chinese New Year’s cake, is sweet and sticky and represents family cohesion and rising fortune. Nian is a homonym for both sticky and year, and gao is a homonym for cake and to rise up. It is a must at Lunar New Year’s time to wish for a family that is stuck together and for good luck in the coming year. As for me, "nian" in this cake also carries one of the most memorable textural experience within my culinary memories, one that I do not ever wish to live without.

Made from glutinous rice flour (preferably the Three Elephant brand from Thailand), and a pair of dedicated hands, this light and delicate flour is kneaded together with sugar, coconut milk and water. The victorious steam creates a veil within the wok as the prized cake rises and transform. As 200 minutes slip away while the master carefully monitors the degree of the steam, the almost 4 hour process has miraculously evolved the velvety fluid batter, into a dense cake that is heavenly soft, creamy, yet carries a multitude of chewiness, an indescribable texture that surpasses any mochi in my opinion. As a bite of the newly made cake dances between my jaw, the prolonged disintegration allows a proper chemical interaction between my senses and the aroma from the coconut milk, as well as the sweetness from the flour and sugar. This texture is well ingrained in my childhood memories. The new year cake should be sticky between your finger tips, but not your razor-sharp teeth.


~ Chinese New Year Cake - Nian Gao ~

- 500g sweet glutinous rice flour (preferably the Three Elephant brand)
- 454g sugar
- 250mL coconut milk
- 150mL water
- vegetable oil - for glazing the pans


1. In a large mixing bowl, thoroughly mix the glutinous rice flour and sugar
2. Mix in the coconut milk in a slow and gradual stream. The mixture will be sticky.
3. Begin to knead and work the mixture until a dough is formed, and the consistency is uniform.
4. Slowly incorporate the water into the dough, a few tablespoons at a time, until you reach a velvety fluid batter consistency
5. Generously glaze with oil a 9 inch baking pan that is at least 4 inches tall. Pour the batter into the pan but not higher than 2/3 of the way up.
6. Place the pan in the steamer and steam for 3-4 hours, over medium heat or a setting that would ensure consistent yet vigorous steam. Make sure the water level does not fall below the bottom of the pan, or over.
7. When the cake is done, remove from the steamer and allow cooling to room temperature.

To serve, simply slice into wedges and serve in a plate. For those who prefer a soft texture, microwave for 20 seconds or steam on boiling water for 5 minutes until softened to the desired consistency.

It is a tradition in my family to pan-fried the new year cake (煎年糕), which is enveloped in a thin layer of crispy savoury egg and served to our guests. When fried, it is slightly crispy exterior complements the magnificant texture within....

Bon Appetit~!

Wednesday, January 20, 2010

Celebrating Japanese New Year....le Macaron de Shōgatsu!

This article is part of "The Macaron Series"
http://lafleuraucacao.blogspot.com/2009/10/in-mood-for-loveand-macaronthe-macaron.html

As we count down along with the crystal ball in NYC, January 1st is also considered by most Japanese to be one of the most important annual festivals and has been celebrated for centuries with its own unique customs. After an evening a festivities, toasts with Champagne, and feeling at ease on my day off, I decided to create macaron that celebrate Japanese New Year (正月) or Shōgatsu.


Japanese people eat a special selection of dishes during the New Year celebration called osechi-ryōri (御節料理). This consists of boiled seaweed (昆布), fish cakes (蒲鉾), mashed sweet potato with chestnut (栗きんとん), simmered burdock root (金平牛蒡), and sweetened black soybeans (黒豆). Many of these dishes are sweet, sour, or dried, so they can keep without refrigeration—the culinary traditions date to a time before households had refrigerators, when most stores closed for the holidays.

This special macaron incorporates one of the ingredients from osechi-ryōri, sweet chestnut, with 2 other signature flavours of Japan, Red Bean (赤豆) and Matcha Green Tea (抹茶).


~ le Macaron de Shōgatsu ~

Makes 20 Macarons

6 Sweet Roasted Chestnuts - cut into 1/4" cubes

1 batch of red bean flavoured macaron shells
for the Macaron Recipe, please click on this link below for the recipe for the Earl Grey Macaron:
http://lafleuraucacao.blogspot.com/2009/10/earl-grey-macaronnew-creation-for.html

* Replace the 8g of Earl Grey tea powder with 8g of Red Bean (Kochi An) powder

1 batch of Matcha Ganache
for the Matcha Ganache Recipe, please click on this link below for the recipe for the le Macaron de l'amour:
http://lafleuraucacao.blogspot.com/2009/11/macarons-that-shimmered-for-union-of.html


Assemble the le Macaron de Shōgatsu:
1. Place the ganache into a piping bag and pipe mixture onto one macaron shell.
2. Place 3-4 pieces of sweet roasted chestnut cubes into the ganache.
3. Gently press an un-piped shell onto the ganache until the ganache just reaches the rim of the macaron.
4. Dust very lightly with Matcha powder if desired.

Bon Appetit!

Saturday, January 16, 2010

Giving the gluten-free grain "keen-wah" an Asian flare....Chinese Five Spice Quinoa Pilaf!

Apart from the ambiance and the company, I find that a memorable dining experience often brings a certain something unexpected. A Mediterranean sampling plate was served, as I was catching up with a friend over dinner at a local "Tavern". Apart from the usual trio of hummus (that itself was surprisingly unusual, with one carrying a green hue of edamame), I was inspired by a salad made with quinoa, a grain I love, but it has been a long while since its last escape from my pantry.


Quinoa is a relative newcomer to the American pantry. The tiny, ancient Peruvian seed, which has a mild, nutty flavor, is closer related to leafy green vegetables like spinach or beets than to a grain.


Quinoa is as versatile as rice but it has a protein content that is superior to that of most grains. Unlike wheat or rice (which are low in lysine), quinoa is a complete protein source containing a balanced set of essential amino acids for humans. Distinguished from most grain, quinoa is also gluten-free, making it an excellent alternative for individuals with gluten-sensitive enteropathy. It is a good source of dietary fiber and phosphorus and is high in magnesium and iron. Its high iron content makes quinoa a favourable ingredient to be incorporated into diets of vegetarians and vegans.

Quinoa in its natural state has a coating of saponins, a bitter substance that protects them against birds and other predators, making it unpalatable. Most quinoa sold commercially in North America has been processed to remove this coating but it is important to rinse the seeds well prior cooking.


With a cooking time of 15 minutes, plus an internally integrated cooking timer (seeds display a little white thread that curls around them when cooked), there is no reason not to replace the bland quick-cooked white rice, with this light and fluffy super "grain"!


~ Chinese Five Spice Quinoa Pilaf ~

*The fragrant yet savoury Chinese Five Spiced powder, along with sweetness from the Hoisin sauce, complement the mild bitterness of quinoa.


Serves 4-6

1 cup quinoa
3 cups water
1 tsp salt
2 tablespoons canola or grapeseed oil
4 garlic cloves, minced
2 tsp Chinese five spiced powder
2 tbs Toasted sesame seeds
2 tbs Toasted sesame seed oil
1 medium onion, chopped
1 tsp sugar
1 lb Asparagus, blanched and cut into 2-inch pieces
4 tbs Chinese Hoisin sauce
salt and freshly ground pepper to taste
Serve with Szechuan Chili Bean Paste

1. Place the quinoa in a strainer and rinse until the water runs clear.
2. Bring the water to a boil in a medium saucepan. Add the salt and the quinoa. Bring back to a boil, reduce the heat to low, cover and simmer 15 minutes, or until the quinoa is tender and translucent, and each grain displays a little thread.
3. Drain and return to the pan. Cover the pan with a clean dish towel, replace the lid and allow to sit undisturbed for 10 minutes. Fluff gently with a fork.
4. Heat a large, heavy frying pan over medium heat add oils, Chinese Five Spiced Powder and sesame seeds. Add the diced onion and garlic after the five spiced powder becomes fragrant, stirring often, until tender, about 5 minutes.
5. Stir in the cooked quinoa, and asparagus over medium heat to heat through, several minutes.
6. Mix in the Hoisin sauce, and add salt and pepper to taste.

Bon Appetit~!

Saturday, January 9, 2010

Turn the deflated toasting bubbly into a refreshing dessert....Gelée de Champagne Lychee

No matter how much you imbibe on New Year’s Eve, chances are you’ll have some already-opened bubbly still left over on the morning, or the week after.


While mimosas, bellinis and other champagne cocktails are always an option on New Year’s Day, a more healthier method can utilise the corked bubbly in creative home cooking. Here I combine one of my favourite tropical fruits to create this refreshing yet simple dessert....

*This recipe can be made into a vegetarian/vegan version with Konnayaku powder or Agar replacing gelatin.

~ Gelée de Champagne Lychee ~


1 tb gelatin = 2 cups liquid *This recipe can be made into a vegetarian/vegan version with Konnayaku powder or Agar
1 Can of Lychee in light syrup
Leftover Champagne
Sugar to taste

1. Combine the leftover champagne with the light syrup from the canned lychee, and measure out the amount of gelatin required for the corresponding volume of liquid.
2. Place the liquid in a saucepan, and sprinkle the gelatin. Allow the gelatin to bloom in the liquid at room temperature for 20 mintues.
3. Heat the champagne mixture with gelatin over medium heat. Constantly stir until all the gelatin is dissolved.
4. Stir and dissolve sugar to your taste. Remove from heat.
5. Place 2 lychee in each champagne glass, and gently pour the champagne mixture into each glass to avoid bubbles.
6. Allow it to cool to room temperature and refrigerate for 4 hours or until the jello sets.

Bon Appetit!

Saturday, January 2, 2010

The Yulelog of Milano, Italy....the Crowd Pleasing Panettone and the creation of Été Trifle!

All day long, a flow of Milanese and tourists has streamed in to buy the dome-shaped, fluffy cake studded with raisins and candied citrus peel, Christmas would not be the same without star on the Italian Christmas table, the Panettone. The first signs of Christmas in Milan are the stacks of trapezoidal boxes, wrapped in blue, cream, white, gold and beige, that crowd the aisles and display windows of coffee shops, pastry shops and confectioners from early November to early January. A traditional Yuletide sweet bread, made with flour, eggs, leavening, butter, sugar, raisins and cedro (the candied rind of a large Sicilian lemon), Milan's panettone is a close cousin to Verona's star-shaped pandoro and Genoa's fennel-flavored pandolce. Unlike these, which are still primarily known locally, panettone has become, for many non-Italians, the symbol of Christmas in Italy.


Months before the panettone goes into the oven to be baked, experienced bakers begins their work in creating this richly sweet yeasted bread, which its taste lies within the secret from a natural yeast. Hop leaves are allowed to macerate and flour and water are gradually added. The mixture obtained is left to ferment for days and then more flour is added to create a dough. The last ingredient to be incorporated into the dough is the fresh mountain butter, plump natural raisins and citrus peels.

Differentiated from daily breads by their richness - and by the addition of fruits, nuts, spices or glazes as well as by shapes or decorations with symbolic references - all Christmas sweet breads are probably descended from the breads baked by ancient Romans as ritual offerings to their gods.

Many legends are associated with panettone. The best known tale links its origins to a 15th-century romance. Ughetto de la Tele, a young man of good family, fell in love with the a poor belle, the daughter of Milanese baker named Tonio. Fearing that his family would oppose the marriage, he supplied Tonio the finest eggs, flour, butter, sugar, raisins and candied peels in creating the bread that became an instant success, making Tonio rich and his daughter a suitable bride.

Despite the origin, there would be not doubts that the panettone is Milan's favorite Christmas dessert, usually eaten with zabaglione or with mascarpone. I have yet to attempt my own trial for this aggressive yet mesmerising flavoured treat from the bare ingredients, but using this luscious cake, my version of the Été Trifle was created; the sweet juicy berries and the lightness from the mascarpone crème will bring sunshine into our snow covered January.


Été Trifle - Summer Trifle
makes 8


1 cup heavy cream
2/3 cup mascarpone - soften and whipped
1/2 cup sugar
Panattone - cut into 1 inch cubes
1 pint Blueberries
2 cup Frozen black cherries
2 tbs lemon juice
1/2 cup Toasted almond slices


1. Place frozen cherries in sauce pan with 1/4 cup sugar and lemon juice. Cook over medium heat until simmer and reduced to 1/2 its volume. Remove from heat and cool completely. Refrigerate.

2. Whip heavy cream to medium peak with 1/4 cup sugar, fold into soften whipped mascarpone. Refrigerate.

3. Spoon 4 tbs of mascarpone crème mixture into each of the 8 martini glasses. Sprinkle fresh blueberries over the crème and cover the cream with panettone cubes.

4. Generously spoon chilled cherry sauce over the panettone layer. Repeat step 3 and 4 two more times.

5. Lastly, place one spoonful of mascarpone crème in the centre and garnish the trifle with a generous sprinkling of toasted almonds.

Bon Appetit!

Tuesday, December 29, 2009

A Christmas cookie exchange sparked the integration of my favourite ingredients....Earl Grey Infused Dark Chocolate Cookie!

~ Earl Grey Infused Dark Chocolate Cookie ~
Since I work at a nutrition research laboratory, to make these cookies just a tad healthier, grapeseed oil is used.


This recipe is an extension to a recent article on Earl Grey:
"Earl Grey....from an obsession to a devotion"


Makes 2 dozen cookies

135g grapeseed oil
100g light brown sugar
150g granulated sugar
55g unsweetened cacao
2 Earl Grey tea bags, grind finely with a coffee grinder
3 large eggs
1 teaspoons vanilla extract
50g bittersweet chocolate, melted and cooled
180g all-purpose flour
7g baking powder
1 pinch salt
200g bittersweet chocolate, coarsely chopped


1. Preheat oven to 350oF. Sift together the flour, baking powder, and salt. Set aside.

2. In a large bowl with the grapeseed oil, stir in the brown and granulated sugars, then stir in the cacao and Earl Grey tea powder until incorporated.

3. Stir in the eggs, one at a time, then the vanilla. Scrape in the melted chocolate, and mix until incorporated.

4. Gradually stir in the flour mixture in 3 additions, do not over mix. During the final addition, add the chopped chocolate along with the flour.

5. Freeze the dough for 4 hours or overnight.

6. Line 2 baking trays with parchment paper. Scoop the cookie dough into tightly formed balls using a small ice cream scoop (size 24). Arrange the dough on the prepared baking trays, about 2 inches apart. Bake for 8 minutes, then turn and bake for another 4 to 5 minutes. Remove cookies from trays with a wide metal spatula and cool on wire rack.

Bon Appetit!

Friday, December 25, 2009

A spicy cheesecake for a white Christmas with friends....

~ Spicy Kabocha Cheesecake with Gingersnap Crust ~


This recipe is an extention to a previous article on Kabocha.
"Giving Thanks with Kabocha....the Japanese Pumpkin...."


Crust:
1 3/4 cups ginger snap crust
1 stick melted salted butter

Filling:
500g cream cheese, at room temperature
100g mascarpone cheese, at room temperature
1 cup roasted Kabocha, pureed
4 eggs
~2/3 cup sugar, depending on the sweetness of the roasted Kabocha
1 teaspoon pumpkin spice mix
1/2 teaspoon ground ginger


1. Preheat oven to 350oF.
2. In medium bowl, combine crumbs and melted butter. Press down flat into a 9-inch cake pan. Refrigerate for 1 hour.
3. Beat cream cheese until smooth. Add pumpkin puree, eggs, yogourt, sugar and the spices. Beat together until well combined.
4. Pour into crust. Spread out evenly and bake in a waterbath for 45-60 minutes. Remove from the oven and let it cool at room temperature. Cover with plastic wrap and refrigerate overnight.


Bon Appetit!

Tuesday, December 22, 2009

Macaron de la divinité captures the essence of this mulberry purple coloured root....

~ le Macaron aux Taro~
Taro flavoured macaron filled with coconut white chocolate ganache


This article is part of "The Macaron Series"
http://lafleuraucacao.blogspot.com/2009/10/in-mood-for-loveand-macaronthe-macaron.html


As the potato of the humid tropics, I consider Taro is one of the most flavourful root, is commonly used within Chinese cuisine in a variety of styles; in desserts it is used in sweet soups, bubble tea, and as a flavouring in ice cream and other desserts in the China. McDonald's sells Taro flavored pies at their stores in China! To celebrate my inner passion for this mulberry purple coloured root, what could be more suited than disguising its essence behind the shining dome of a macaron?

For the Macaron Recipe, please click on this link below for the recipe for the Earl Grey Macaron:
http://lafleuraucacao.blogspot.com/2009/10/earl-grey-macaronnew-creation-for.html

* Replace the 8g of Earl Grey tea powder with 8g of Taro powder


~ Coconut White Chocolate Ganache ~

4 tbs Coconut Powder (can be found in Asian supermarkets)
4 oz White Chocolate Couverture, finely chopped and place in stainless steel bowl
1/2 cup Heavy Cream

1. Mix 2 tbs of heavy cream into the Coconut powder to form a smooth paste
2. Place the remaining heavy cream in a saucier over medium heat and bring it to a near simmer
3. Pour the hot cream over the finely chopped white chocolate, and very gently stir until all white chocolate pieces have melted
4. Stir in the Coconut paste until it has completely incorporated with the white chocolate ganache
5. Allow the Coconut ganache to cool and thicken
6. Place the Coconut ganache into a piping bag to assemble le Macaron aux Taro!


Bon Appetit!

Thursday, December 3, 2009

Recipe: Szechuan Spiced Israeli Couscous with Infused with Dried Shiitake

~ Szechuan Spiced Israeli Couscous with Infused with Dried Shiitake ~

An Asian flavoured vegan side dish that is a perfect addition to your holiday dinner!


This recipe is an extension to a previous post:
Where a mushroom intertwines with the receptor of the fifth taste....the Dried Shiitake and the Mysterious Umami....


1 lb package Israeli couscous
1 lb Frozen edamame, defrosted and shelled
8-10 Dried whole shiitake
4 cloves garlic, smashed
2 tbs Toasted sesame seeds
2 tbs Toasted sesame seed oil
2-3 tbs Szechuan Chili Bean Paste
1 tsp Szechuan peppercorn
3-4 tbs Chinese chicken marinate sauce (this is vegan)
1 tsp sugar
salt and freshly ground pepper to taste
12 Sweet roasted chestnut - optional


1. Soak the dried shiitake in ~1 cup of COLD water overnight, then squeeze out the excess liquid from the reconstituted shiitake and slice thinly.
*Do not discard the soaking liquid, as it has now been infused with the luring aroma of the shiitake, which will be used later to cook the Israeli couscous
2. In a 4-6 quart pot, heat the Toasted sesame seed oil in medium heat, then add the sliced shiitake.
3. Stir fry the shiitake till lightly golden, then add the smashed garlic and Szechuan peppercorn and toast them until golden.
4. Stir in the Israeli couscous and allow it to toast for 2 minutes, turn the heat to high then add the amount of liquid as instructed on the package (use the shiitake soaking liquid plus water). Cover and allow it to come to a rapid boil.
5. Reduce heat so the mixture returns to a simmer. Stir occasionally with spoon and cook until the Israeli couscous has absorbed all the cooking liquid and has become al-dente.
6. Mix in the defrosted shelled edamame and allow it to heat with couscous for 2 minutes.
7. Stir in the marinate sauce and chili bean paste and allow the couscous to absorb the sauce for about 1-2 minutes.
8. Remove from heat and stir in the toasted sesame seeds and sweet roasted chestnuts.
* I think the sweetness and the chewy texture from the luscious chestnuts give this side dish a special touch and an unique sensory experience!

Bon Appetit!

Saturday, November 28, 2009

Let's Give the American Classic with an Asian Kick....The Luscious Pecan Pie with Roasted Kabocha!

Recipe: Luscious Pecan Pie with Roasted Kabocha


This article is an extension to a previous post on Kabocha:
"Giving Thanks with Kabocha....the Japanese Pumpkin...."

Since most of us have our favourite recipe for this American Classic, I will not insert a recipe here.

~ Roasted Kabocha ~


1 (~ 2lb) Kabocha
2 Cinnamon Sticks
2 tbs Unsalted Butter
4 tbs Brown Sugar
1 pinch salt
1 tsp Pumpkin Pie Spice


1. Pre-heat the oven to 350oF
2. Split the Kabocha in half lengthwise, and remove the seeds with a spoon
3. Place 1 tbs of butter in each of the halfs, sprinkle evenly with brown sugar, salt and pumpkin pie spice
4. Place 1 cinnamon stick in each half and bake for 1 hour
5. "Base" the Kabocha with the melted butter and sugar in its cavity, then bake for another 30 minutes, or until golden


~ Pecan Pie with Kabocha ~

1. Follow your favourite recipe for Pecan Pie, first prepare the crust
2. Slice the roasted Kabocha thinly and evenly spread the slices at the bottom of the crust in one single layer
3. Pour the filling over the Kabocha and decorate it with pecan halfs


4. Bake the Pecan Pie according to the time indicated in your recipe, plus 3-5 minutes


Bon Appetit!

Tuesday, November 24, 2009

The Macarons that Shimmered for the Union of Two Hearts....the Perfect Couple....

~ le Macaron de l'amour ~
Almond Macaron with Matcha Ganache


This article is part of "The Macaron Series"
http://lafleuraucacao.blogspot.com/2009/10/in-mood-for-loveand-macaronthe-macaron.html


For the Macaron Recipe, please click on this link below for the recipe for the Earl Grey Macaron:
http://lafleuraucacao.blogspot.com/2009/10/earl-grey-macaronnew-creation-for.html

* Replace the 8g of Earl Grey tea powder with 8g of almond powder


~ Matcha Ganache ~


1 tbs Matcha or Green Tea Powder
8 oz White Chocolate Couverture, finely chopped and place in stainless steel bowl
1/2 cup Heavy Cream

1. Mix 2 tbs of heavy cream into the Matcha powder to form a smooth paste
2. Place the remaining heavy cream in a saucier over medium heat and bring it to a near simmer
3. Pour the hot cream over the finely chopped white chocolate, and very gently stir until all white chocolate pieces have melted
4. Stir in the Matcha paste until it has completely incorporated with the white chocolate ganache
5. Allow the Matcha ganache to cool and thicken
6. Place the Matcha ganache into a piping bag to assemble le Macaron de l'amour!


Each Macaron was dust with Super Pearl Luster Dust....

le Macaron de l'amour was used as the decor for these cupcakes....for the very special couple~!

Bon Appetit!

Thursday, November 12, 2009

Recipe: la bruschetta du marché des agriculteurs....

A recipe that is dedicated to the hardworking individuals at the farmer's market, and an extension to a previous post "For the Love of Figs":

http://lafleuraucacao.blogspot.com/2009/11/for-love-of-figs.html


This simple recipe is basically a collusion of flavours from the freshest ingredients selected at the local farmer's market, further enhanced with a homemade Black Mission Figs infused balsamic vinaigrette!

I love how the beams of the Sun glaze over this dish....it gives the relaxing sensation of a lazy Sunday afternoon....

1 loaf of rustic bread, sliced into 3/4 inch in thickness
6-8 heirloom tomatoes, sliced into 1/2 inch in thickness
3 cloves garic, minced
1 lb fresh mozzarella, sliced into 1/2 inch in thickness
Coarse salt
freshly grounded 4 blended peppercorns
good extra virgin olive oil
Black Mission Figs infused Balsamic vinegar - see below for recipe


1. Marinate the sliced tomatoes and half of the garlic with just enough olive oil to coat them, set them aside for 15 minutes
2. Lightly drizzle the sliced bread with olive oil, and sprinkle with the remaining minced garlic
3. Place the bread slices evenly on a baking sheet lined with aluminum foil, and toast them in a 400oF oven for 5 minutes, or just till golden
4. Place the sliced mozzarella over the bread and return it to the oven to toast just till the cheese is gently melted
5. Place the bread slices on a serving plate, and decorate them with the marinated tomatoes
6. Sprinkle them with salt and freshly grounded pepper, and drizzle generously with the Black Mission Figs infused balsamic vinegar


Black Mission Figs Infused Balsamic Vinegar

8oz Dried Mission Figs, remove the stem and quarter each fig
750mL Balsamic Vinegar of Modena
1 pinch of salt
Sugar to taste

1. Place the Balsamic vinegar in a saucier over high heat until it reaches a simmer
2. Reduce the heat to medium and add the Dried Mission Figs
3. Allow the figs to simmer in the balsamic vinegar until the vinegar has reduced to half its original volume
4. Remove from heat and using a hand blender, blend until figs are completely incorporated into the vinegar. I leave this un-strained, as I think the grittiness of the seeds from figs gives the vinegar its character

Bon Appetit!

Mission Fig on Foodista

Sunday, November 8, 2009

Recipe: Tiramisù aux Marrons Glacés

Recipe: Tiramisù aux Marrons Glacés
the magic unleashes when the beloved Tiramisu and Mont-Blanc collide....


This article is part of "The Chestnut Series"
http://lafleuraucacao.blogspot.com/2009/10/autumn-ingredient-for-chilling.html


Serves 10 to 12

2/3 cup castor sugar
3 cups whipping cream
2 (8 oz.) containers mascarpone cheese
1 tablespoon vanilla extract
pinch of salt
2 pkg. ladyfingers.
1/3 cup cold strong coffee or espresso
1/3 cup dark rum
250g crème de marrons
200g unsalted butter, at room temperature
Cocoa powder for dusting


1. In a large bowl, lightly beat the mascarpone until smooth. Add the castor sugar, cream, vanilla, and salt and using an electric beater, beat this mixture until it is smooth and thickened like fluffy cream.

2. Using a spring-form 9 x 13-inch pan, 3-inch deep, quickly dip ladyfingers in dark rum and line them in the bottom of the pan, a single even layer.

3. Cover the ladyfinger layer with half of the mascarpone mixture. Dust liberally with cocoa powder.

4. Add another layer of ladyfingers dipped in dark rum, and cover it with the remaining mascarpone mixture.

5. Cover tightly with plastic wrap and refrigerate at least 24 hours. This is important, as it blends the flavors and the ladyfingers soak up the liquid.

6. To make the Marrons Glacés cream, beat the room temperature butter until fluffy. Add the crème de marrons and beat until combined.

7. Remove the tiramisu from the spring-form pan, and place it on plate or cake turn-table.

8. Using a spatula, evenly cover the tiramisu with the soft Marrons Glacés cream.

9. Refrigerate until ready to serve.

Bon Appetit!

LinkWithin

Related Posts Plugin for WordPress, Blogger...